This page talks about the standard features of both Vendor and Customer:
When the application is launched, Main Activity sends an intent to the Splash Activity, which displays the App Logo for 2000 milliseconds, from where the control comes back to the Main Activity. The app splash screen is the brief introductory screen that appears as the app loads after the user has just opened the app.


- Registration:
New users can register by entering their information. Their account gets created upon submitting the registration form. The new user fills out their e-mail ID, mobile number, and Password. They will select the type of user in a spinner. If the type of user is a vendor, they have to add a URL of the picture of their food outlet. Then on clicking register, a new account is created. - Login:
Users can log in using their Username. The user is directed to the Login Activity for authentication. The User first selects what type of user (i.e., Customer or Vendor) in the Spinner on the Login page. The Username for the customer would be their PhoneNumber, and for the Vendor, it would be their OutletName. Once the user clicks on the Login button, we verify if such an account with the given Username exists in the Database or not. If it doesn't exist, we display a Toast message saying, "No Account found". If the username is valid, then we verify the Password entered by the User by comparing it with the corresponding Password to the Username stored in the Database. If it is valid, then the User is redirected to their respective pages.
- Login via OTP(Additional Feature): Users can also alternatively login via their Phone Number. We've used PhoneAuthProvider and PhoneAuthOptions for this purpose. They are classes defined by Firebase for the purpose of Phone Number verification.
After the user enters their Phone Number, we verify if such a number exists in the Database or not. If the number exists, we send an OTP using the PhoneAuthOptions class. For the verification of the OTP, we use PhoneAuthProvider class to verify if the OTP entered by the user matches that of the one sent. On successful authentication, the user is redirected to the respective pages.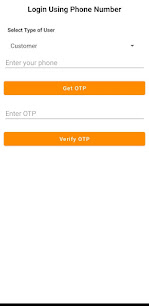


Comments
Post a Comment